JSTL 라이브러리가 없거나 구버전 사용시 발생함.
build.gradle 에 추가
// JSTL
implementation('javax.servlet:jstl:1.2')
implementation('org.apache.tomcat.embed:tomcat-embed-jasper:10.0.14')
JSTL 라이브러리가 없거나 구버전 사용시 발생함.
build.gradle 에 추가
1. spring-boot-starter-web 내부에서 log4j 사용함.
2. @Log4j, @Slf4j 사용 안하면 영향 없음.
3. 그래도 찝찝하니까 패치
build.grade
// 종속성 추가
configurations {
	all {
		resolutionStrategy.eachDependency { DependencyResolveDetails details ->
			if (details.requested.group == 'org.apache.logging.log4j') {
				details.useVersion '2.15.0'
			}
		}
	}
}

// 라이브러리 추가
dependencies {
	// log4j
	implementation(platform("org.apache.logging.log4j:log4j-bom:2.15.0"))
}
Spring boot와 Vue.js를 연동해봅니다.
이 문서에서는 Controller를 어디에 만드는지, cd 명령어는 어디에 입력하는지 등의 모든 과정을 설명하지는 않습니다.
결과물은 이쪽에 --> https://github.com/febdy/Spring-boot-vuejs
Version
Spring boot 2.0.3
Vue.js 2.5.16
Webpack 3.12.0
Gradle 4.x
최종 폴더 구조 예시
project
│
├ src (Spring boot)
│├ main
││ ├ java
││ └ resources
│└ test
│
├ frontend (Vue.js)
│├ build
│├ config
│├ node_modules
│├ src
││ ├ assets
││ │├ css
││ │├ images
││ │└ js
││ │
││ ├ router
││ ├ shared-components
││ ├ spa
││ │ ├ Member
││ │ │ ├ components
││ │ │ └ Login.vue
││ │ │
││ │ └ Qna
││ │ ├ components
││ │ └ Qna.vue
││ │
││ ├ App.vue
││ └ main.js
││
│├ static
│├ test
│├ .bablerc
│├ .editorconfig
│├ .eslintingore
│├ .eslintrc.js
│├ index.html
│├ package.json
│└ package-lock.json
│
├ build.gradle
├ gradlew
├ gradlew.bat
└ settings.gradle
frontend 구조 참고 : https://github.com/vuejs-kr/vuejs-kr.github.io/issues/28
STEP
1. Spring boot
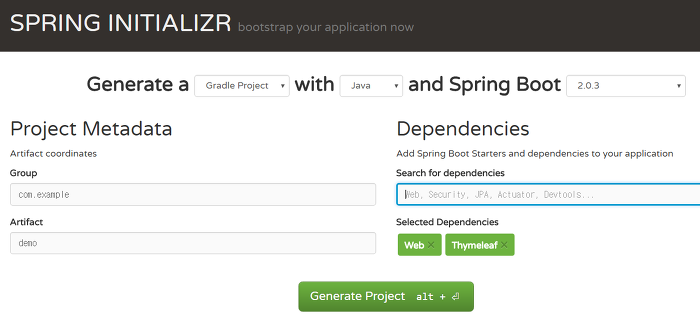
Spring boot는 매우 쉽고 편한 프로젝트 생성 방법을 제공합니다.
Gradle Project를 선택하고 Dependencies엔 Web과 Thymeleaf 정도 추가해주고 Generate Project로 프로젝트를 받습니다.
옆에 패키지 이름은 원하는 대로 설정.
2. Controller
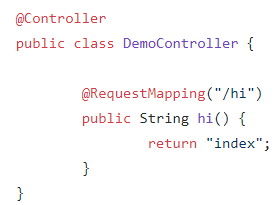
간단히 Controller를 만들어봅니다.
주소/hi를 입력하면 thymeleaf에 의해 resources/templates 안에 있는 index.html에 연결됩니다.
Vue.js
1. node.js 설치
현재(180718) 기준 8.11.3 LTS 설치했습니다.
2. vue-cli install / init webpack project
cd [만들어놓은 Spring boot 폴더] 로 이동해 실행합니다.
$ npm install --g vue-cli
$ vue init webpack frontend
3.
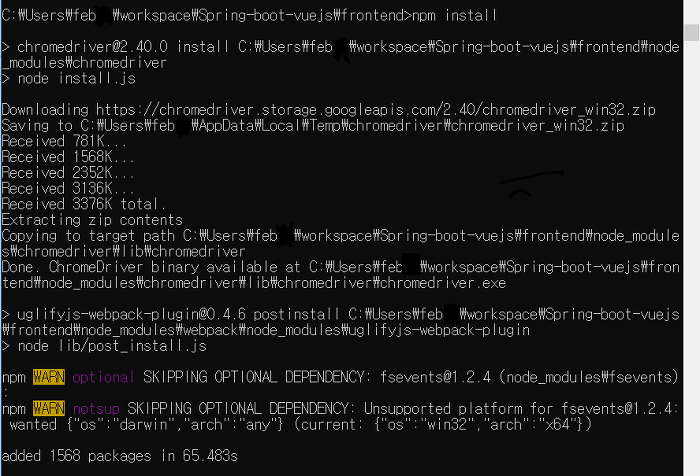
$ cd frontend
$ npm install
frontend 폴더 안에 가서 package들을 install합니다.
node_modules라는 폴더가 생깁니다.
4. config/index.js
build: {
// Template for index.html
index: path.resolve(__dirname, '../../src/main/resources/static/index.html'),
// Paths
assetsRoot: path.resolve(__dirname, '../../src/main/resources/static'),
assetsSubDirectory: 'static',
assetsPublicPath: '/',
config/index.js 파일의 경로를 이렇게 수정합니다.
※
+)
application.properties 파일에서
spring.thymeleaf.prefix=classpath:/static/
추가해줍니다.
static/ index.html 를 읽으려면 thymeleaf의 prefix를 templates가 아닌 static으로 바꿔주어야 합니다.
Vue.js config/index.js의 index 경로를 templates으로 잡으면 spring 설정 없이 그대로 index를 사용 가능 하지만 배포할 때 js 파일을 못 읽을 수도 있습니다.
해결 방법은
1. Spring boot에서 thymeleaf의 경로를 바꾸거나
2. Vue.js에서 빌드 설정을 바꿔 static/static/을 인식하게 하는 건데
위가 쉽고 간단하므로 이렇게 해봅니다.
5. npm run build

$npm run build
밑에 파란 글씨의 Build Complete.을 확인합니다.
6. Spring boot server run
각자에게 맞는 방법으로 실행해봅니다.
이클립스로는 프로젝트 우클릭 -> Run as -> Spring Boot App.
5. localhost:포트번호/hi
브라우저에서 localhost:포트번호/hi를 입력하고 확인해봅니다. Vue 페이지가 뜨면 성공입니다.
* Vue.js 파일 수정 후 바로바로 확인하기
Vue.js 파일을 바꾸고 확인할 때마다 build를 해볼 수는 없겠지요.

$ npm run dev
명령어를 입력하면 개발 모드로 들어가며 파일을 수정하고 저장하는 즉시 바로바로 확인할 수 있습니다.
나오는 방법은
Ctrl + C
이 서버는 스프링 부트 서버와 별도입니다.
따라서 Vue.js 프로젝트를 확인하기 위해 꼭 Spring boot 서버를 실행할 필요는 없으며
Spring boot 서버에서 확인하고 싶으면 npm run build를 해주어 build된 파일이 다시 src/main/resources에 들어가도록 해야 합니다.
다른 툴은 모르겠고 이클립스를 사용중이라면 npm run build를 했을 때 프로젝트 폴더에서 F5를 눌러 새로고침을 한 번 해주세요.
src/main/resources 반영이 제때제때 자동으로 안 됩니다. 스프링 부트 서버도 종료했다가 다시 실행해야 합니다.
끝~
출처: https://febdy.tistory.com/65 [집]
출처: https://febdy.tistory.com/65 [집]
출처: <https://febdy.tistory.com/65>
JSP의 위치
src/main/webapp/WEB-INF/jsp
기존 SpringBoot는 src/main/resources/teamplates에 타임리프가 들어가면 간단하게 조회된다.
그렇다면 JSP는 위치가 다른데 어떻게?
1. gradle, maven이면 디펜던시를 추가해야한다.
gradle의 경우
compile("javax.servlet:jstl")
compile("org.apache.tomcat.embed:tomcat-embed-jasper")
- 필요하다면 버전을 추가한다, 필자의 경우 springboot 플러그인으로 알아서 버전을 찾아준다.
maven의 경우
<dependency>
<groupId>javax.servlet</groupId>
<artifactId>jstl</artifactId>
</dependency>
<dependency>
<groupId>org.apache.tomcat.embed</groupId>
<artifactId>tomcat-embed-jasper</artifactId>
</dependency>
- maven도 마찬가지로 버전이 필요하면 추가한다.
2. 자바 설정 혹은 application.properties에 경로를 지정한다.
@Configuration
public class SpringConfig extends WebMvcConfigurerAdapter {
@Bean
public ViewResolver getViewResolver() {
InternalResourceViewResolver viewResolver = new InternalResourceViewResolver();
viewResolver.setPrefix("/WEB-INF/jsp/");
viewResolver.setSuffix(".jsp");
return viewResolver;
}
}
혹은
spring.mvc.view.prefix: /WEB-INF/jsp/
spring.mvc.view.suffix: .jsp
참고)
시작점 코드(com.mysample.root)
@SpringBootApplication
public class Application {
public static void main(String[] args) {
SpringApplication.run(Application.class, args);
}
}
@SpringBootApplication에는
@EnableAutoConfiguration
@ComponentScan이 포함되어 자동으로 하위 package 경로(com.mysample.root이하)는 자동으로 읽는다.
출처: https://seongtak-yoon.tistory.com/23 [테이키스토리]
1. HttpServletRequest, HttpServletResponse
2. HttpSession
3. Local
- java.util.Locale 지역 정보
4. InputStream, Reader
- HttpServletRequest의 getInputStream(), Reader
5. OutputStream, Writer
- HttpServletResponse의 getOutputStream(), Writer - 서블릿 형태로 만들때 사용한다.
6. @PathVariable
- @RequestMapping의 URL {} 부분의 패스 변수를 받는다.
만약 타입이 틀린 값이 들어오면 HTTP 400 - Bad Request 가 전달 된다.
|
1 2 |
@RequestMapping("/board/{id}") public void view( @PathVariable("id") int id ) {...} |
7. @RequestParam
- 스프링 내장 변환기가 다룰 수 있는 모든 타입을 지원한다.
해당 파라미터가 없다면 HTTP 400 - Bad Request 가 전달 된다.
- file의 경우는 <input type="file" name="file" /> 에 매핑 된다.
|
1 2 3 |
public String edit( @RequestParam("id") int id, @RequestParam("title") String title, @RequestParam("file") MultipartFile file ) {...} |
- 맵 형태로 받으면 모든 파라미터 이름은 맵의 키에 파라미터 값은 맵의 값에 담긴다.
|
1 |
public String add( @RequestParam Map<String, String> params ) {...} |
- 파라미터가 필수가 아니라면 required = false 로 지정하면 된다.
이때 파라미터가 없으면 NULL이 들어간다. default 값을 지정 할 수도 있다.
|
1 2 3 |
public void view( @RequestParam(value = "id", required = false, defaultValue = "0" ) int id) {..}. |
8. @CookieValue
- @RequestParam과 동일 하며 쿠키값을 가져올 때 사용한다.
|
1 2 |
public String check( @CookieValue("check") String check, required = false, defaultValue = "" ) {...} |
9. @RequestHeader
- 헤더 정보를 메소드 파라미터에 넣어 준다. Ajax로 처리할때 $.ajax(...) 에서 head에 특정 값을 넣고 여기서 받아서
있으면 ajax이고 없으면 일반페이지라는 식으로 이용하면 된다.
|
1 |
public String header( @RrequestHeader("ajax") String ajax ) {...} |
10. Map, Model, ModelMap
- view를 String으로 리턴해 주고 Attribute를 Map, Model, ModelMap 에 담을 수 있다.
11. @ModelAttribute
- 파라미터를 Object형태로 받을때 사용된다. 일반적인 파라미터 형태로 쓰인 경우 타입이 일치하지 않으면 객체에 매핑 되지
않으며 에러는 발생 시키지 않는다. 자동으로 ModelMap에 담기므로 modelMap.addAttribute를 해 줄 필요가 없다.
|
1 |
public void update( @ModelAttribute("board") Board board) {...} |
- 메소드에도 @ModelAttribute를 설정 할 수 있다. 리턴값이 항상 나머지 컨트롤러에 자동 추가 되며 보통 참조용 데이터 등에
이용된다.
|
1 2 |
@ModelAttribute("emailList") public Map<String, String> getEmailList() { ... } |
12. Errors, BindingResult
- 모델의 값을 검정한다. 이때 BindingResult나 Errors의 파라미터 값의 위치는 반드시 @ModelAttribute 뒤에 위치해야 한다.
자신의 바로 앞에 있는 @ModelAttribute 파라미터의 검정 작업만 하기 때문이다.
|
1 2 |
@RequestMapping(value = "/board/add", method = RequestMethod.POST) public String add( @ModelAttribute("board") Board board, BindingResult result ) {...} |
13. SessionStatus
- 모델 오브젝트를 세션에 저장하여 계속 사용한다. 더이상 모델 오브젝트를 사용하지 않을 때는 세션에서 제거해 줘야 한다.
14. @RequestBody
- HTTP body 부분만 전달 한다. XML 이나 JSON 으로 출력 할 경우 사용한다.
리턴타입의 @ResponseBody 를 참조하자.
15. @Value
- 프로퍼티값이나 값을 파라미터에 적용한다.
|
1 2 3 4 5 6 7 8 9 |
public class BoardController { @Value("${eng.url}") String engUrl;
@RequestMapping(..) public String gotoEng() { return this.engUrl; } } |
- 위는 프로퍼티중 eng.url 의 값을 String engUrl에 매핑 시키고 메소드에서 사용한 케이스다. 파라미터에도 적용 된다.
|
1 2 3 |
public String gotoEng( @Value("${eng.url}") String engUrl ) { return engUrl; } |
16. @Valid
- JSR - 303 검증기를 이용해서 @ModelAttribute를 검정하도록 한다.
|
1 |
public String add( @Valid @ModelAttribute("board") Board board, BindingResult result ) { ...} |
관련 문서
목차
개발단계에서 사용빈도가 높은 어노테이션 위주로 정리.
목차에 없는 항목은 API 문서를 참고할 것. 구글링하는게속편한건함정
@Component
패키지: org.springframework.stereotype
버전: spring 2.5
설정 위치: 클래스 선언부 앞
<context:component-scan> 태그를 설정파일에 추가하면 해당 어노테이션이 적용된 클래스를 빈으로 등록하게 된다. 범위는 디폴트로 singleton이며 @Scope를 사용하여 지정할 수 있다.
사용하려면 XML 설정파일에 <context:component-scan>을 정의하고 적용할 기본 패키지를 base-package 속성으로 등록한다.
context:annotation-config 태그는 어노테이션과 관련해서 다음의 BeanPostProcessor를 함께 등록 한다.
예를 들어 다음처럼 설정하면:
|
<context:component-scan base-package="xxx"/> |
xxx 패키지 하위에 @Component로 선언된 클래스를 bean으로 자동 등록한다. bean의 이름은 해당 클래스명(첫글자는 소문자)이 사용된다.
<context:component-scan /> 요소에는 scoped-proxy 속성이 존재 한다. scoped-proxy는 <aop:scoped-poxy/>처럼 WebApplicationContext 에서만 유효하며 "session", "globalSession", "request" 이외의 scope는 무시 되며 아래의 3가지 값을 설정 할 수 있다.
|
@Component @Scope("prototype") // 생략하면 싱글톤 public class Test { ..... } |
CGLIB
기존의 자바 클래스파일로부터 자바의 소스코드를 동적으로 생성하는 라이브러리(자바 소스 변경)
http://sourceforge.net/projects/cglib/
스캔 대상 클래스 범위 지정하기
<context:include-filter> 태그와 <context:exclude-filter> 태그를 사용하면 자동 스캔 대상에 포함시킬 클래스와 포함시키지 않을 클래스를 구체적으로 명시할 수 있다.
|
<context:component-scan base-package="spring.demo" scoped-proxy="no"> <context:include-filter type="regex" expression="*HibernateRepository"/> <context:exclude-filter type="aspectj" expression="..*IBatisRepository"/> </context:component-scan> |
위와 같이 <context:include-filter> 태그와 <context:exclude-filter> 태그는 각각 type 속성과 expresseion 속성을 갖는데, type 속성에 따라 expression 속성에 올 수 있는 값이 달라진다. type 속성에 입력가능한 값은 다음과 같다:
@Required
패키지: org.springframework.beans.factory.annotation
버전: spring 2.0
설정 위치: setter 메서드 앞
Required 어노테이션은 필수 프로퍼티임을 명시하는 것으로 필수 프로퍼티를 설정하지 않을 경우 빈 생성시 예외를 발생시킨다.
|
import org.springframework.beans.factory.annotation.Required
public class TestBean { @Required private TestDao testDao;
public void setTestDao(TestDao testDao) { this.testDao = testDao; } } |
|
<bean class="org.springframework.beans.factory.annotation.RequiredAnnotationBeanpostProcessor"/> <bean name="testBean" class="han.test.TestBean"> <property name="testDao" ref="testDao"/> <!-- @Required 어노테이션을 적용하였으므로 설정하지 않으면 예외를 발생시킨다. --> </bean> |
RequiredAnnotationBeanPostProcessor 클래스는 스프링 컨테이너에 등록된 bean 객체를 조사하여 @Required 어노테이션으로 설정되어 있는 프로퍼티의 값이 설정되어 있는지 검사한다.
사용하려면 <bean class="org.springframework.beans.factory.annotation.RequiredAnnotationBeanPostProcessor" /> 클래스를 빈으로 등록시켜줘야 하지만 이를 대신하여 <context:annotation-config> 태그를 사용해도 된다:
|
<beans xmlns="http://www.springframework.org/schema/beans" xmlns:context="http://www.springframework.org/schema/context" xmlns:xsi="http://www.w3.org/2001/XMLSchema-instance" xsi:schemaLocation="http://www.springframework.org/schema/beans http://www.springframework.org/schema/beans/spring-beans-3.1.xsd http://www.springframework.org/schema/context http://www.springframework.org/schema/context/spring-context-3.1.xsd"> <context:annotation-config/> </beans> |
@Autowired
패키지: org.springframework.beans.factory.annotation
버전: spring 2.5
설정 위치: 생성자, 필드, 메서드(setter메서드가 아니여도 된다) 앞
의존관계를 자동설정할 때 사용하며 타입을 이용하여 의존하는 객체를 삽입해 준다. 그러므로 해당 타입의 빈객체가 존재하지 않거나 또는 2개 이상 존재할 경우 스프링은 예외를 발생시키게 된다.
options:
사용하려면 <bean class="org.springframework.beans.factory.annotation.AutowiredAnnotationBeanPostProcessor" /> 클래스를 빈으로 등록시켜줘야 한다. 해당 설정 대신에 <context:annotation-config> 태그를 사용해도 된다.
@Autowired를 적용할 때 같은 타입의 빈이 2개 이상 존재하게 되면 예외가 발생하는데, Autowired도 이러한 문제가 발생한다. 이럴 때 @Qualifier를 사용하면 동일한 타입의 빈 중 특정 빈을 사용하도록 하여 문제를 해결할 수 있다.
|
@Autowired @Qualifier("test") private Test test; |
@Qualifier
패키지: org.springframework.beans.factory.annotation
버전: spring 2.5
설정 위치: @Autowired 어노테이션과 함께 사용된다.
qualifier 어노테이션은 @Autowired의 목적에서 동일 타입의 빈객체가 존재시 특정빈을 삽입할 수 있게 설정한다. @Qualifier("mainBean")의 형태로 @Autowired와 같이 사용하며 해당 <bean>태그에 <qualifire value="mainBean" /> 태그를 선언해주어야 한다. 메서드에서 두개이상의 파라미터를 사용할 경우는 파라미터 앞에 선언해야한다.
options:
사용하려면 동일타입의 빈객체 설정에서 <qualifier value="[alias명]" />를 추가해 준다.
|
<bean id="user2" class="com.sp4.UserImpl"> <property name="name" value="스프링"/> <property name="age" value="20"/> <property name="tel" value="000-0000-0000"/> </bean>
<bean id="userService1" class="com.sp4.UserService"/> |
|
public class UserService { @Autowired @Qualifier("user2") private User user;
public String result() { return user.getData(); } } |
@Resource
자바 6 및 JEE5에 추가된 것으로 어플리케이션에서 필요로 하는 자원을 자동 연결할 때 사용 한다. 스프링 2.5 부터 지원하는 어노테이션으로 스프링에서는 의존하는 빈 객체를 전달할 때 사용한다.
@Autowired와 흡사하지만 @Autowired는 타입으로(by type), @Resource는 이름으로(by name)으로 연결한다는 점이 다르다.
options:
사용하려면 <bean class="org.springframework.beans.factory.annotation.CommonAnnotationBeanPostProcessor"/> 클래스를 빈으로 등록시켜줘야 한다. 해당 설정 대신에 <context:annotation-config> 태그를 사용해도 된다.
|
<beans> <!-- 기타 설정 생략 --> <context:annotation-config/>
<bean id="user2" class="com.test.UserImpl" p:data="65536"/> </beans> |
|
public class UserService { @Resource(name="user2") private User user; //UserImpl user2 = new UserImpl(); //User user = user2;
public void setUser(User user) { this.user = user; } public String result() { return user.getData(); } } |
@Scope
패키지: org.springframework.beans.factory.annotation
설정: prototype, singleton, request, session, globalSession
스프링은 기본적으로 빈의 범위를 "singleton" 으로 설정한다. "singleton" 이 아닌 다른범위를 지정하고 싶다면 @Scope 어노테이션을 이용하여 범위를 지정한다.
|
@Component @Scope(value="prototype") public class Worker { } |
|
@Component @Scope(value="prototype", proxyMode=ScopedProxyMode.TARGET_CLASS) public class Worker { } |
@PostConstruct
패키지: javax.annotation
버전: jdk1.6, spring 2.5
설정 위치: 초기화 작업 수행 메서드 앞
의존하는 객체를 설정한 이후에 초기화 작업을 수행하기 위해 사용한다.
사용하려면 CommonAnnotationBeanPostProcessor 클래스를 빈으로 등록시켜줘야 한다. <context:annotation-config> 태그로 대신할 수 있다.
|
@PostConstruct public void init() { System.out.println("객체 생성 후 내가 먼저 실행된다."); } |
@PreDestroy
패키지: javax.annotation
버전: jdk1.6, spring 2.5
설정 위치: 해당 작업 메서드 앞
컨테이너에서 객체를 제거하기 전에 해야할 작업을 수행하기 위해 사용한다.
사용하려면 CommonAnnotationBeanPostProcessor 클래스를 빈으로 등록시켜줘야 한다. <context:annotation-config> 태그로 대신할 수 있다.
@Inject
SR-330 표준 Annotation으로 Spring 3 부터 지원하는 Annotation이다. 특정 Framework에 종속되지 않은 어플리케이션을 구성하기 위해서는 @Inject를 사용할 것을 권장한다. @Inject를 사용하기 위해서는 클래스 패스 내에 JSR-330 라이브러리인 javax.inject-x.x.x.jar 파일이 추가되어야 함에 유의해야 한다.
@Service
@Service를 적용한 Class는 비지니스 로직이 들어가는 Service로 등록이 된다. Controller에 있는 @Autowired는 @Service("xxxService")에 등록된 xxxService와 변수명이 같아야 하며 Service에 있는 @Autowired는 @Repository("xxxDao")에 등록된 xxDao와 변수명이 같아야 한다.
|
@Service("helloService") public class HelloServiceImpl implements HelloService { @Autowired private HelloDao helloDao;
public void hello() { System.out.println("HelloServiceImpl :: hello()"); helloDao.selectHello(); } } |
helloDao.selectHello(); 와 같이 @Autowired를 이용한 객체를 이용하여 Dao 객체를 호출한다:
|
@Service("test2.testService") //괄호 속 문자열은 식별자를 의미한다. //괄호를 생략할 경우 클래스명 그대로 사용한다. //따라서 ,같은 클래스명이 존재 할 시 같은 식별자가 생성되기때문에 에러가 발생한다. public class TestService { public String result(int num1, int num2, String oper) { String str = null;
if (oper.equals("+")) { //... return str; } } } |
@Resouce로 연결
|
@Resource(name="test2.testService") //name에 필요한 것은 @Service("test2.testService") <- 여기서 괄호 속 문자열, 즉 식별자
private TestService service; //TestService service = new TestService(); 라고 하는것과 같은 식
@RequestMapping(value="/test2/oper.action", method={RequestMethod.GET}) public String form() throws Exception { return "test2/write"; } |
@Repository
패키지: org.springframework.stereotype
버전: spring 2.0
@Repository는 일반적으로 DAO에 사용되며 DB Exception을 DataAccessException으로 변환한다.
|
@Repository("bbs.boardDAO") public class BoardDAO { private SqlSession sqlSession;
public int insertBoard(Board dto) throws Exception { ... } } |
|
public class BoardServiceImpl implements BoardService { @Resource(name="bbs.boardDAO") private BoardDAO dao;
public int insertBoard(Board dto){} } |
@Controller
http://noritersand.tistory.com/474
@RequestMapping
http://noritersand.tistory.com/475
@RequestParam
http://noritersand.tistory.com/357
@SessionAttributes
SessionAttribute annotation은 세션상에서 model의 정보를 유지하고 싶을 경우 사용한다.
|
@Controller @SessionAttributes("blog") public class BlogController { // 중간생략
@RequestMapping("/createBlog") public ModelMap createBlogHandler() { blog = new Blog(); blog.setRegDate(new Date()); return new ModelMap(blog); }
// 중간생략 } |
@ModelAttribute
http://noritersand.tistory.com/365
@RequestBody
@RequestBody 어노테이션이 적용된 파라미터는 HTTP Request body의 내용이 전달된다.
참고: http://java.ihoney.pe.kr/283
|
@RequestMapping(value="/test") public void penaltyInfoDtlUpdate(@RequestBody String body, HttpServletRequest req, HttpServletResponse res, Model model, HttpSession session) throws Exception {
System.out.println(body); } |
@ResponseBody
참고: http://ismydream.tistory.com/140
클라이언트에 JSON 형식의 값을 응답할 때 유용하다. 메서드에 @ResponseBody를 적용한 후 문자열을 리턴하면 그 값은 HTTP response header가 아니라 HTTP response body에 쓰여진다. 객체를 넘길경우 스프링에 내장된 JACKSON에 의해 문자열로 변환될 것이다.
또한 @ResponseBody가 적용된 컨트롤러는 context에 설정된 resolver를 무시한다.
|
@RequestMapping("/getVocTypeList") @ResponseBody public ArrayList<Object> getVocTypeList() throws Exception { HashMap<String, Object> vocData = gvocInf.searchVocTypeList(); return (ArrayList<Object>) vocData.get("data"); } |
@PathVariable
URL의 일부를 파라미터 혹은 변수로 사용한다.
|
package com.sp.ex;
@Controller("ex.exController") public class ExController{ @RequestMapping(value="/blog/{userId}/main.action", method=RequestMethod.GET) public String main(HttpServletRequest req , @PathVariable String userId) throws Exception {
req.setAttribute("userId", userId); return "restful/result"; } } |
Spring quartz 사용시 cronExpression 입니다.
월~금요일만 실행하고 싶어서 day-of-week 옵션을 설정했지만
day-of-week 를 잘못설정하면 이런 오류가 나더군요.
Support for specifying both a day-of-week AND a day-of-month parameter is not implemented.
변경전 : 0 0 20 * * MON-FRI
변경후 : 0 0 20 ? * MON-FRI
아래는 기본 설정방법입니다.
초 0-59 , - * /
분 0-59 , - * /
시 0-23 , - * /
일 1-31 , - * ? / L W
월 1-12 or JAN-DEC , - * /
요일 1-7 or SUN-SAT , - * ? / L #
년(옵션) 1970-2099 , - * /
* 모든 값
? 특정 값 없음
- 범위 지정에 사용
, 여러 값 지정 구분에 사용
/ 초기값과 증가치 설정에 사용
L 지정할 수 있는 범위의 마지막 값
W 월~금요일 또는 가장 가까운 월/금요일
# 몇 번째 무슨 요일 2#1 => 첫 번째 월요일
예제)
Expression Meaning
초분시일월주(년)
"0 0 12 * * ?" 아무 요일, 매월, 매일 12:00:00
"0 15 10 ? * *" 모든 요일, 매월, 아무 날이나 10:15:00
"0 15 10 * * ?" 아무 요일, 매월, 매일 10:15:00
"0 15 10 * * ? *" 모든 연도, 아무 요일, 매월, 매일 10:15
"0 15 10 * * ? 2005" 2005년 아무 요일이나 매월, 매일 10:15
"0 * 14 * * ?" 아무 요일, 매월, 매일, 14시 매분 0초
"0 0/5 14 * * ?" 아무 요일, 매월, 매일, 14시 매 5분마다 0초
"0 0/5 14,18 * * ?" 아무 요일, 매월, 매일, 14시, 18시 매 5분마다 0초
"0 0-5 14 * * ?" 아무 요일, 매월, 매일, 14:00 부터 매 14:05까지 매 분 0초
"0 10,44 14 ? 3 WED" 3월의 매 주 수요일, 아무 날짜나 14:10:00, 14:44:00
"0 15 10 ? * MON-FRI" 월~금, 매월, 아무 날이나 10:15:00
"0 15 10 15 * ?" 아무 요일, 매월 15일 10:15:00
"0 15 10 L * ?" 아무 요일, 매월 마지막 날 10:15:00
"0 15 10 ? * 6L" 매월 마지막 금요일 아무 날이나 10:15:00
"0 15 10 ? * 6L 2002-2005"
2002년부터 2005년까지 매월 마지막 금요일 아무 날이나 10:15:00
"0 15 10 ? * 6#3" 매월 3번째 금요일 아무 날이나 10:15:00


|
| 일 | 월 | 화 | 수 | 목 | 금 | 토 |
|---|---|---|---|---|---|---|
| 1 | 2 | 3 | 4 | 5 | 6 | |
| 7 | 8 | 9 | 10 | 11 | 12 | 13 |
| 14 | 15 | 16 | 17 | 18 | 19 | 20 |
| 21 | 22 | 23 | 24 | 25 | 26 | 27 |
| 28 | 29 | 30 |
